If Bruce Lee was a Carpenter
Another year almost done and dusted. It’s now almost halfway through December and the countdown for Christmas has begun. Luckily for us, we won’t be around for Christmas day as we are going to Switzerland for a white Christmas. Actually, the plan is to go skiing for a week and then stay with some friends in Zurich for another week. However, due to my broken arm, I don’t know if I will get all that much skiing done. I have an x-ray booked for this coming Friday and that will give me an indication of how much the healing process is underway. If them bones haven’t still knitted together, the week of skiing might turn into a week of sightseeing. Anyway, what will be will be. Que sera.
Meanwhile I am still doing boat projects. The current work in progress is to install the VHF radio and the Fusion stereo unit. I have decided to mount these in the wooden door on the starboard inner companionway bulkhead. They complement the distribution panel and engine dash on the port side. So far I have removed the door and cut out the holes to accommodate the two units. Originally, the EPIRB was mounted on the door, so I will have to find another location for it. This also necessitates filling in the holes in the wood where the EPIRB was screwed to.
As described in a previous post, my woodworking skills need a lot of development and this project was part of the learning process too. It looked pretty simple on paper. I basically needed to cut out two square holes for the two radios. Each radio came with an A4 paper template, which I photocopied and cut out with scissors and then sticky taped to the door. The VHF required four 22mm circular holes in each corner, Then you get a jigsaw and join the holes up. Sounds easy. I already had a couple of circular hole cutters but not in 22 mm, so it was up to Bunnings for some shopping. The previous hole cutters I had bought weren’t on the shelves but they had the same brand in a yellow package and a blue package. The yellow package cutter didn’t have the usual array of teeth, but instead one tungsten carbide tip and was labelled for cutting wood. The blue package had the usual teeth and was labelled as being suitable for metal. Because my project was cutting holes in wood, I bought the yellow tungsten hole cutter and proceed homewards. I mounted it in the arbor mounting tool and set up the door in the work bench. This is where my inexperience let me down. Assuming that the wood tool would be suitable for wood, I soon learnt that this was not the case. Yes, it was designed for wood but not designed to cut a neat hole. Instead, it basically just ripped out a chunk of wood in the vicinity of the where the hole was supposed to go. I did drill a small pilot hole so that the drill bit in the hole cutter had a centreline to follow. However, the one tooth tungsten cutter just went off on its own merry way and ripped through the plywood until emerging out the other side, taking great chunks with it. No nice neat hole here. Nothing to see folks, move on, move on. I would dearly love to know how you determine that a hole cutter labelled for cutting wood, isn’t suitable for cutting wood. I think I have asked similar questions before. Maybe Professor Severus Snape in his dark arts class can offer an explanation. I should have bought the metal cutter and things would have turned out a lot better.
After I got the jigsaw fired up and made the necessary cuts between the holes, cleaned up the area with a file and then test fitted the radio unit. The hole looked like it had been punched out by Bruce Lee with one chop. There were splinters everywhere and it wasn’t a job I could be proud of. However, the radio did fit and the surrounds did hide the damage. Onto the next hole for the stereo. This hole didn’t have the rounded corners so I didn’t need to use the 22 mm hole basher. But I did need some sort of hole with which to start the jigsaw off. I used a 30 mm hole cutter in the abor and chuck and bored a hole near the border of the template. Even though this was a metal hole cutter, it did a much neater job on the wood. A few minutes later I had a reasonably neat square hole in the door and had test fitted the stereo.
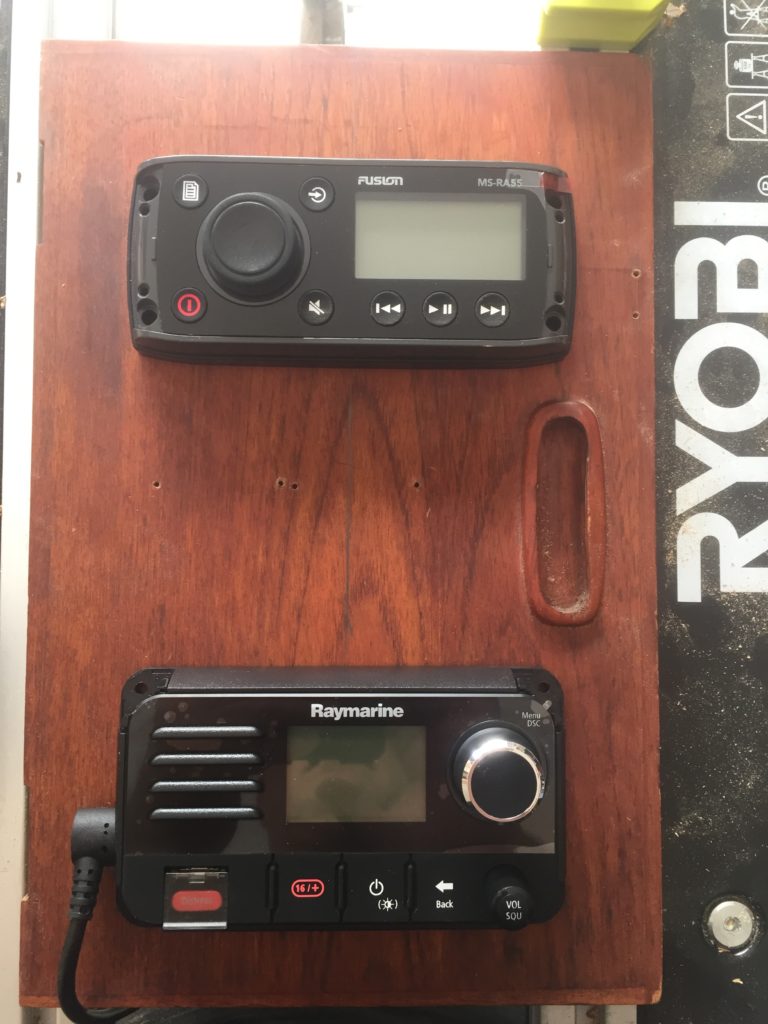
During my foray to Bunnings, I picked up some filler for holes in timber and tried to match up the colour. The door was stained plywood, so trying to match it to cedar or teak colouring was virtually impossible. I filled the screw holes from the EPIRB and some of the splintered bits on the back left by Mr Lee. The back wasn’t stained and was quite a light colour but you won’t see it, especially after a few coats of varnish.
So that’s where I am up to with this project. Getting out the varnish and finishing off the door is the next step and then I can mount the two radio units. I am going to screw in an electrical connector to the back of the door and wire the positive and negative feeds for the units to it. I have already run the wiring from the distribution panel to the area as well as the aerial cable, so fingers crossed it will all work nicely. The Fusion stereo has two box speakers which I will screw into the ceiling somewhere and then work out howto get the speaker wire from there to the back of the stereo. I am confident that I won’t get that done before the new year, especially as we fly out of Australia in a fortnight.
Don’t fear, I will fill you in on the progress as it happens. Not a screw will be screwed or a cable connected without it being documented or filmed. I haven’t filmed anything yet, I am not that sort of person. I don’t feel the need to post it all on Youtube and I don’t think people will be all that interested anyway.
The next blog will be about the coming year and what we have planned and hope to do. But more about that next time.